Recently I’ve had a conversation with an older guy who owns a pawn shop. He started to complain about business not doing well, how he lacks ideas and the drive, how he’s demoralized and overwhelmed by the technology advancement. “We can’t adapt so quickly to the new stuff like you youngsters. We’re slowly being discarded,” he told me while trying to persuade me to buy a used Mac, which he couldn’t use and understand well. How are you doing in the tech compartment? The technology today really progresses quickly. And many might feel left behind, or frightened to compete in this fast-paced world. Take the modern work atmosphere for example. New and improved technologies are a must nowadays ‒ if you can’t cope with the latest tech or apps, you’re outdated. Being outdated might put you in a bad position or bring you trouble. That’s why I’m sharing some tips that will help you use both Mac & Windows machine better and easier. If you’re not as good in the tech section and you’re trying to fit in the new work environment, this is the post for you. It doesn’t matter if you’re a bit older. It doesn’t have to be that tough. You can do it. Start using these 10 tips and you’ll get better on PC & Mac in no time!
1. Quickly hide or close a lot of running apps.
There are many reasons to open a lot of folders at the same time. It could be either to transfer files from one to another or to rearrange your folders simply through the partitions. If not managed well, your screen can get stacked with a bunch of folders which might just confuse you instead of making you more productive. To navigate more easily through folders that you need, it is advisable that you close or hide the ones that are redundant at the moment. The question is: how to do it?
For Mac OS: press and hold the command button ⌘ and keep pressing the Tab key. By doing this, you will list the apps and for the those you wish to close, you just have to press Q key, while for those that you want to hide, press the H key.
2. Type quickly with your voice with a “hidden” Dictation app.
If you need something written down and you’re not skilled with typing, the Dictation app could prove to be very useful. You can find the Dictation app in System Preferences within the Apple menu. To start writing with your voice, press the (fn) button (located in the upper left corner of a standard Mac keyboard), start talking and after you have finished, press the (fn) button again and your speech will be converted to text. The best feature of this app is that you can use it while offline, which makes it convenient while traveling. That is if you don’t mind the strange looks you’ll be getting while talking to yourself. This program offers its users the option to edit occasional mistakes that are known to happen when dictating to a computer. It remembers the changes and guarantees an improved experience each time you use it. While this feature is still new to the Windows OS, it works surprisingly well on Mac. If the dictation app is disabled on your PC (this happens often), it is easy to enable it by going to Settings > Dictation and Speech. If the box next to the “Enhanced Dictation” is unchecked, make sure to check the box, close the settings and you are ready to go! No more being embarrassed for not being able to type like a machine.
3. Switching fast on a dual-monitor.
Dual-monitor setup is common in offices nowadays; it brings more screen real estate into your workspace and enables you to have/do more. Programmers and designers enjoy these benefits the most. For example, if you have opened Adobe Photoshop on the left screen and Adobe Illustrator on the right, you will probably reach a point when you want to transfer something from one program to another, i.e. from one monitor to the other. All you have to do is to press the Windows button together with the (Shift) and left arrow (ß) and this will instantly switch you to the left monitor. The procedure is fairly similar when going to the right, except this time you’ll be using the right arrow key (à) and that’s it. Also, if your monitors are connected correctly, you can hold your file with the left mouse click and drag it to the other monitor. Simple as that. This problem has an even easier solution on a Mac. Pressing ⌘ and F1 at the same does the trick with newer generations of Mac computers. For older versions, your best bet would be to click manually on the dormant monitor before sliding back and forth.
4. Install Windows on your Mac PC.
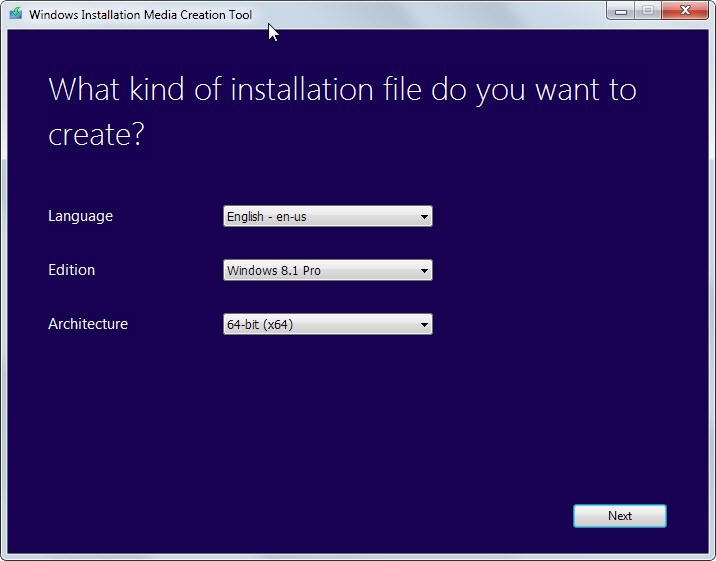
Some programs don’t work as good on Windows as on Mac. Some programs are Windows-only. If you don’t want to waste your time by emulating an entirely different OS, the solution is dual boot – install Windows on your Mac. This is perfectly legal, don’t worry. Installing Windows on a Mac PC could be a difficult task for some people; if you’re willing to go for it, check out the detailed guide that will take you through the process effortlessly. Before you start with the installation, you will need to have an Intel-based Mac,Microsoft Windows version 8 or higher OS media or (ISO) disk image and at least 55 GB of free disk space on your Mac. Do not forget to check the system requirements for the Windows OS that you are trying to install on your Mac as the requirements will have a massive impact on both the installation process and the functionality of Windows OS.
5. Hide and display the Start menu whenever you need it.
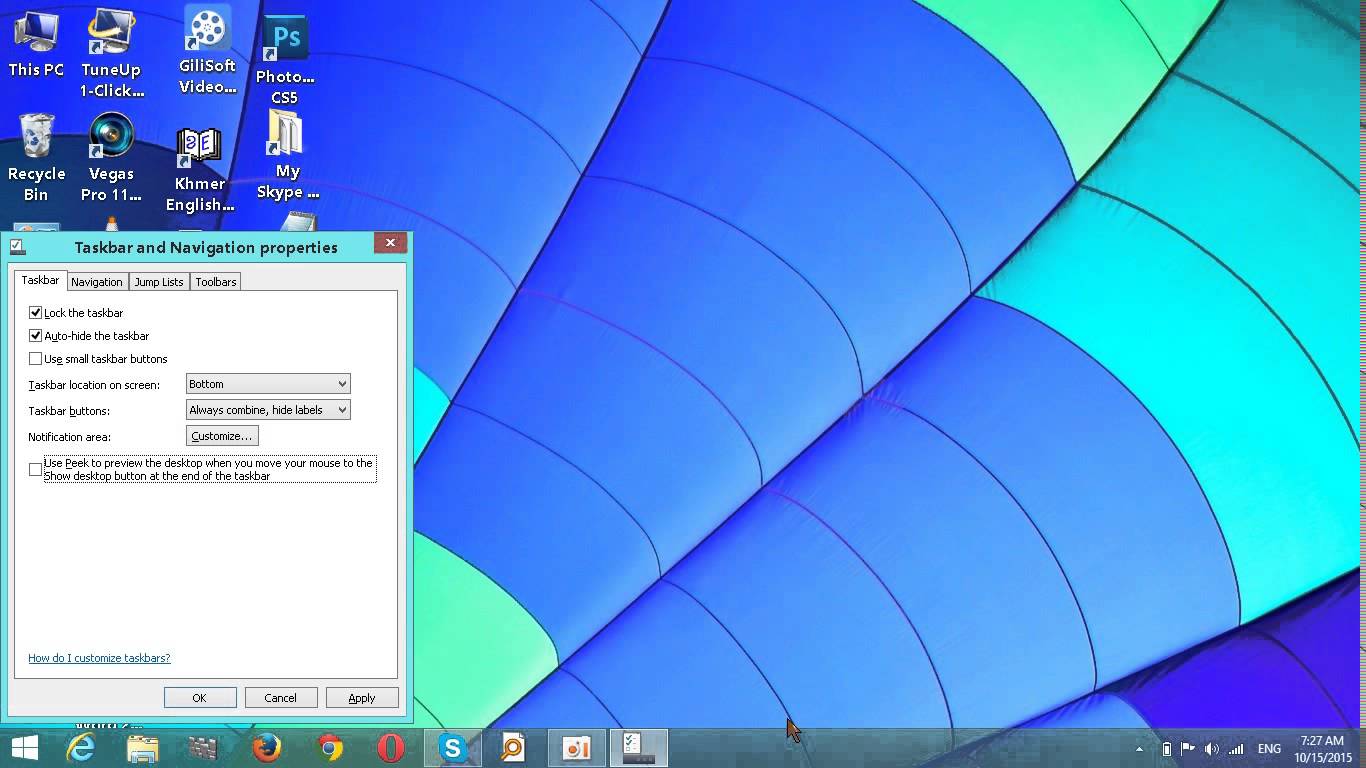
You might have seen this on a colleague’s computer, and got confused. No Start menu at all? What’s wrong? This is just an auto-hide option that Windows offers to its users. To enable it, you just right-click on the taskbar and go to Properties. Check the “Auto-Hide Taskbar” option and hit “Apply” button. By doing this, your taskbar will “disappear” but should you need it, press the Windows key, and it will appear together with the search option. Same goes with the mouse hover. This option is very popular among the programming community since using this option allows programs to be fully opened without displaying the taskbar on the bottom. Of course, whenever you feel like having your taskbar at the bottom again, follow the same steps but uncheck the “Auto-Hide Taskbar” and check the “Lock the Taskbar” option. When it comes to Mac OS, the taskbar is, of course, known as a dock and you can hide it if you wish to. The Dock icon within the System Preferences opens up a window where you can check a box to hide the dock automatically.
6. Preview any file.
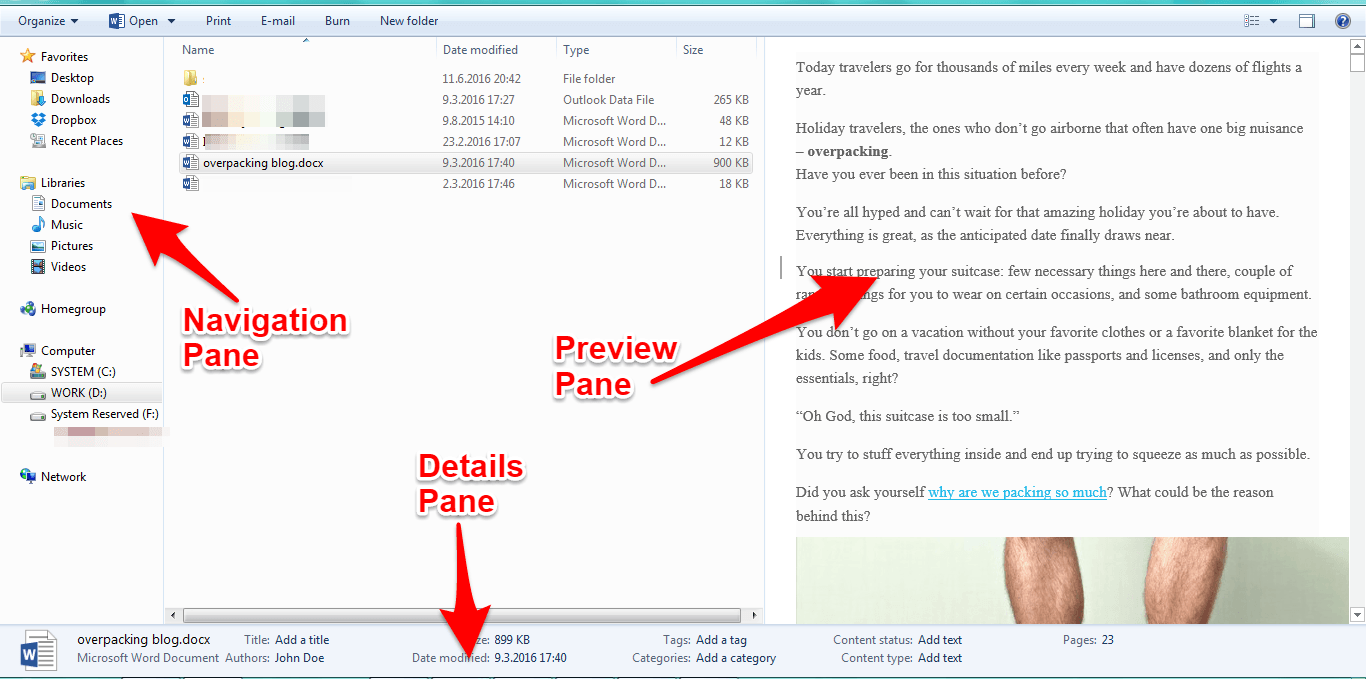
If you are one of the Mac owners, did you know that you can preview any type of file, even the Photoshop files and videos? Select the desired file that you wish to preview, and press and hold the spacebar. You stop previewing the file by releasing the spacebar. Feel free to preview any adjacent files by simply using your keyboard arrows while holding space. This feature is perfect for all of you who are into photography since finding the right one could be a bit tiresome without the preview option. This feature enables you to go quickly through the pictures and selected the ones you like and separate them from the folder that you are previewing. The same thing is available with videos, as long as the video format fulfills the requirements of this excellent feature. If you’re on Windows, you’re limited to the preview pane which can be turned on in the folders settings. If you want to enable it, click on “Organize”, head to “Layout” and select the preview pane to show. Same goes for Windows versions from 7 and above.
7. Force quit an app.
At some point, all of us have faced with the “Application has stopped working” and a frozen screen, which made us try the various options just to make it go away. Struggling with this kind of a problem is common for novices, but there is a quick, professional solution. One of the easiest ways to make the application force quit on Mac is to press the Command key together with the Option and Escape. By doing this, the “Force quit application window” will appear and all you have to do is to select the desired app that you wish to close and force quit it. It can be compared to the more famous Windows option which utilizes the Ctrl+Alt+Delete buttons. When you use this command on a Windows machine, Windows Task Manager will open, where you can see the apps that run at the moment and quickly find the one which misbehaves. Sometimes an app can get pretty stubborn in its disobedience to close. In those cases, you can apply different, advanced ways to force quit an app on Mac. When you look into them further, you won’t have problems with stubborn apps. Overall, make sure you’re running latest drivers and official apps, which usually don’t misbehave.
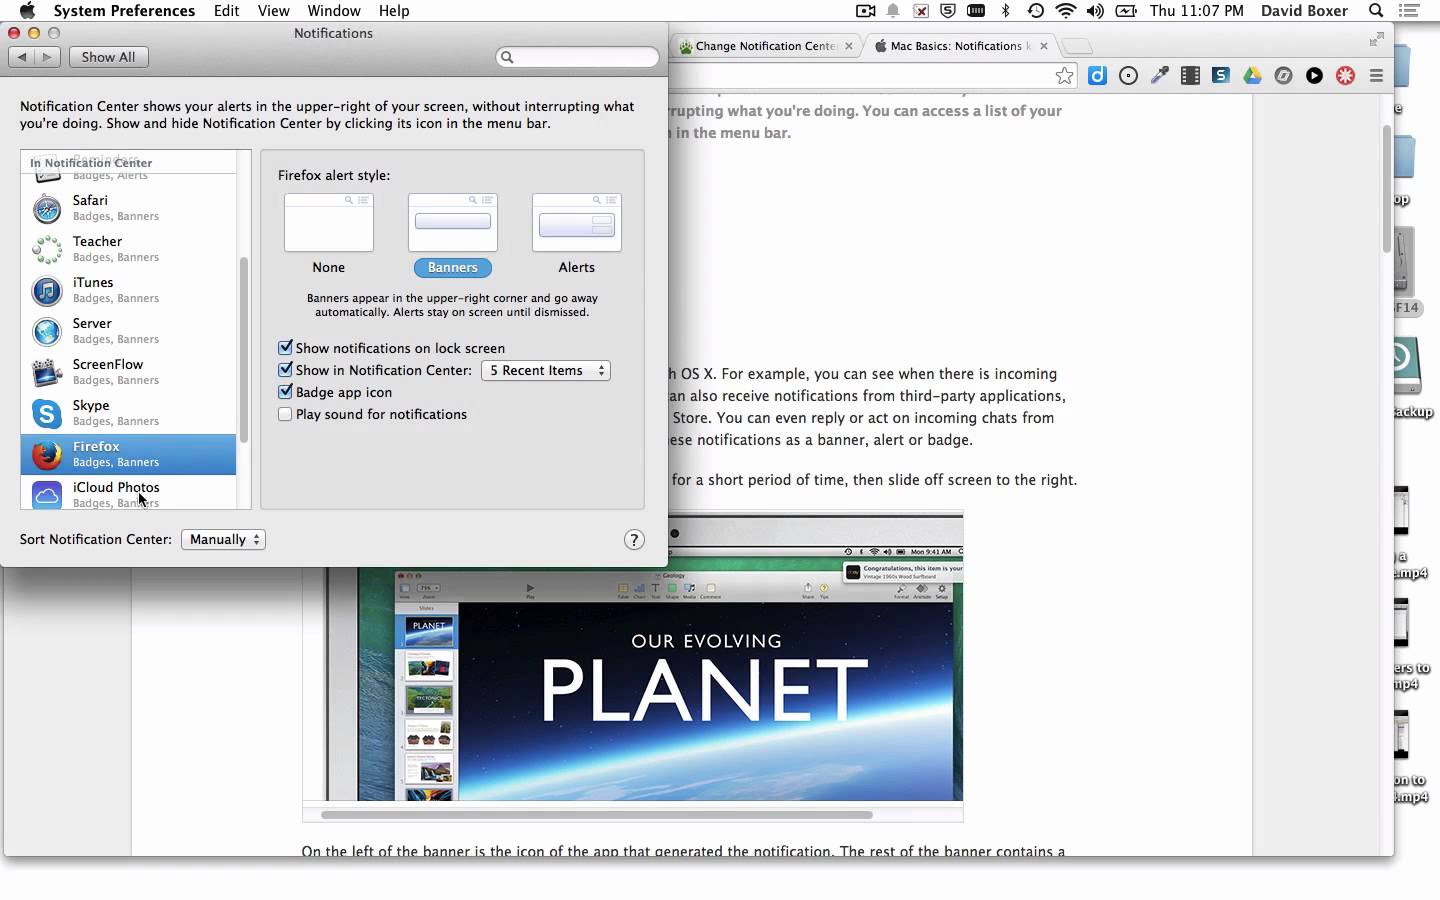
8. Disable notification pop-ups.
Once you have done this, you will see that the icon color is changing from gray to black, which means that all notifications won’t arrive until you turn that option back on. If this didn’t work for you, and you still see some of the notifications appearing on your screen, make sure to check out a detailed guide to see if you did everything that is needed. If you have a Windows OS, notifications are disabled inside All Settings > System > Notifications and Actions (Windows 10). For Windows 7, go to Control Panel > All Control Panel Items > Notification Area Icons and customize which apps you want on your notification tray.
9. Change brightness and volume quickly.
Another cool shortcut that is good to know is how to modify the level of brightness on your Mac quickly as well as to turn down the volume fast, as it may come handy in some situations. If you are watching some content that is way too bright press the shift key (⇧) + Option key (⌥), and a small window will pop up where you can set up the brightness. Don’t forget to look after your eyes, especially if you are pulling long hours sitting in front of a computer. When it comes to the adjustment of sound on your computer, it can be quite irritating if your main speaker is out of your reach. To turn down the volume, without the need to stretch yourself across the desk, you have to press and hold the shift key (⇧) and use the scroll on your mouse. By doing this, a small sound window will appear allowing you to see and adjust the current volume level of your speakers. Windows users, you have to click on a small notification tray and change the sound there. If you’re on a laptop, there are keys for both brightness and sound adjustment on the keyboard.
10. Create your own keyboard shortcut.
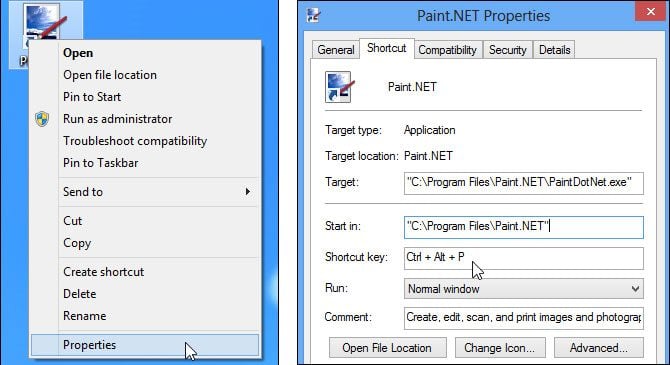
In the world of computers, automation and shortcuts form a killer combo. Every professional computer user has them; these bad boys make us several times more productive and make our computers work exactly like we want them to. Windows users have the privilege with this possibility, as Mac users can’t enjoy it in full swing (Yosemite adds app shortcuts to the keyboard, which gets Mac users pretty close to this function). In order to make your own keyboard shortcut in Windows, you’ll need a desktop shortcut first. To do this, you need to right-click and select the “Create Shortcut” option. Then, choose the app or folder you’d like to have a shortcut for, and press “Apply.” Once you’ve made sure you have the shortcut on your desktop right click on it and go to Properties. After the new window has appeared, select the “Shortcut Key” line and in that blank space put whichever key you want, for example, K button. By doing this you are ready to go, your shortcut will be created, and you can access it by pressing the [Ctrl] + [Alt] + [K] buttons. This one might help a lot for you to look more tech-savvy.
You can stay current.
Computers can help us a lot if we understand them and use them properly. The key to being current and productive, is persistence, routine, and positive attitude. Nothing is that tough that you can’t beat it. Especially some operating systems. You can do it.
Start using these tips today and edge the competition!