You could also do this project to create more bulletin board space in your home office, kitchen, utility room, or other area to serve as a communication center for your family’s calendars, forms, and schedules. It’s very easy to do. Believe me, if I can do this project, so can you! Here is what you need:
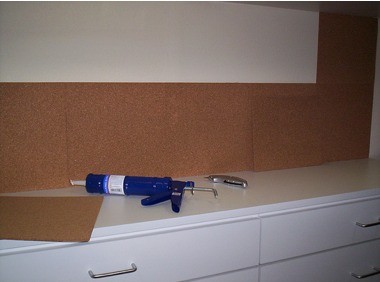
Cork tiles (information and options below) Adhesive- I used Liquid Nails “Paneling” formula because it specifically mentioned corkboard on the label. I am sure there are other options. Caulking gun (if your adhesive requires it) Measuring tape Permanent marker Sharp utility knife and a cutting surface (a cardboard box works well) Yardstick or other straight edge for cutting
First, measure your space. You could be doing an entire wall or just a section of one, or even the back of a door. Get creative! Use your measurements to decide then how much cork you’ll need to buy. I used 12 x 12” cork tiles, so it was easy to figure out what was needed. The cork tiles can be difficult to find locally—you may want to call ahead before trying some stores. I was surprised that they were NOT available at home improvement stores. I found them at Michael’s (a chain of craft stores- but they did not carry them online). Here are some places I found them on the web: Corkfloor.com and BoardDudes. Corkfloor.com also has an excellent selection of colors if you want to get even more elaborate, and Corkstore.com has rolls of cork that you could use to carve shapes if you want to make it a work of art. You need to make sure whatever you buy is thick enough for pushpins to work well. Also buy extra tiles in case you make a cutting mistake. Think through your layout of tiles before gluing them on. I had one row of tiles that required trimming, so I decided to have the cut edges underneath the upper shelving so they would not show as much. I glued the whole tiles on first, then I cut each piece to fit above it. I marked the required cuts with my marker and cut them with the utility knife against the yardstick as a guide. Use the cardboard box underneath when you are cutting to make sure you don’t damage the surface below. I also recommend cutting the tiles just slightly larger than you think, since the material is “spongy” and will line up more cleanly if you fit them very tightly. This project took me less than an hour, not counting the time needed to shop for the supplies. Get inspired! Lorie Marrero is a Professional Organizer and creator of The Clutter Diet, an innovative, affordable online program for home organization. Lorie’s site helps members lose “Clutter-Pounds” from their homes by providing online access to her team of organizers. Lorie writes something insanely practical every few days or so in the Clutter Diet Blog. She lives in Austin, TX, where her company has provided hands-on organizing services to clients since 2000.